Sometimes when you have food restrictions you automatically write foods off when you can’t make them using their traditional recipes thinking that they won’t be as good. Well, pesto should not be one of those recipes. Make it without the cheese and bits and I think it tastes just as good.
Dairy-Free, Nut-Free Pesto Recipe:
Food processor stuffed with fresh basil leaves
1-2 heads of garlic (2 heads for an 8 cup food processor, 1 head for a 4 cup or smaller)
1/4-1/2 tsp salt (Go by taste here, use the lesser amount for the smaller food processor. I actually prefer to add 1/8 tsp at a time and then taste in between to be sure I don’t get too much.)
Pulse until all the ingredients are finely chopped.
Slowly begin to drizzle in olive oil until your mixture is creamy. Taste it. Tweak the seasonings if needed. A little more salt maybe. A little more basil. Maybe it needs some more olive oil to make it creamier. Work with it until you like the flavor.
Store in freezer bags or small air tight containers. It’s best to store in single serving sizes so that you can just thaw out what you need for a batch of pasta or pizza. Refrigerate for 1-2 weeks or freeze for a up to a year (if it lasts that long).
It’s that easy and it tastes great! You’ll never miss the cheese or nuts. In fact, I prefer it without it.
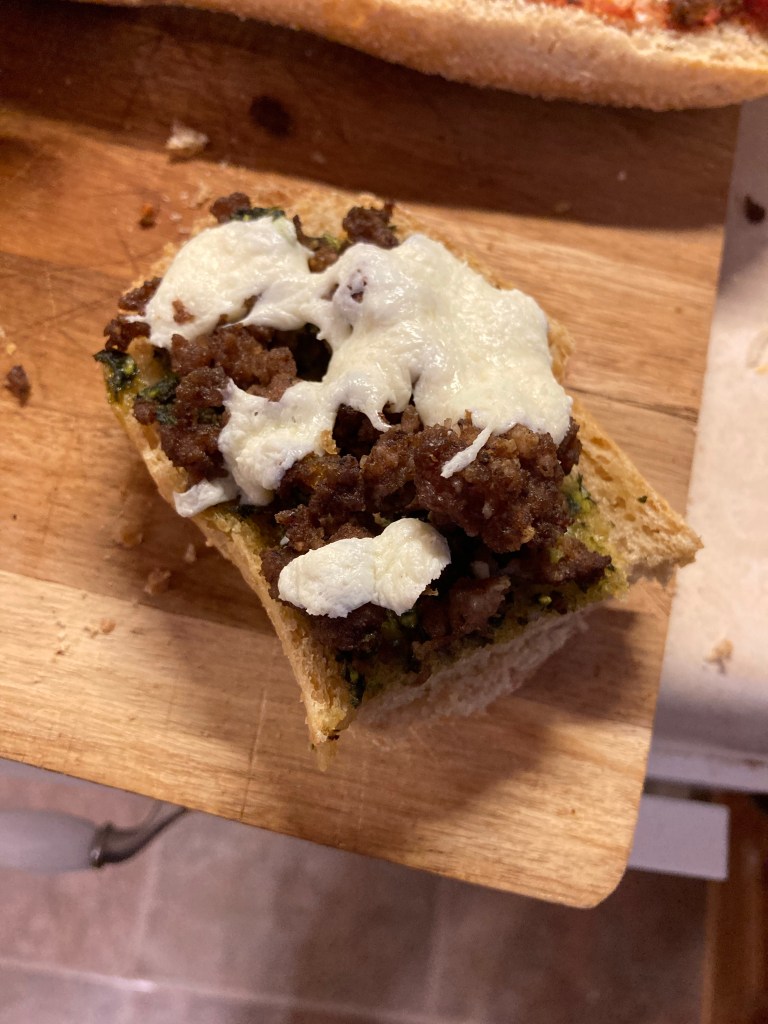
We turned these nice homemade French bread loaves into French bread pizzas with fresh mozzarella and they are delish! They pesto is hiding in there under the meat and cheese. 😊 We took some of these to a church event, and I can’t tell you how many people were thankful for the dairy-free and nut-free pesto. It is nice when people get to enjoy a food that they normally can eat at a group event because someone was considerate of their allergies. I know I appreciate that. 😊
The stress of moving and just life this summer resulted in me cutting out wheat products from my diet. I found that wheat was aggravating my stress symptoms.
Those of you that are gluten-free know that your options for good bread, buns, biscuit options are limited. This is a quick and easy recipe, and the best thing is that it only uses 5 main ingredients, and you can bake it in the oven!
The only piece of equipment that you need are a set of crumpet rings. This set of six crumpet rings is nice since that is about how many crumpets or biscuits this recipe makes. I only have a set of four rings so I have to bake in two batches. Get the set of six. It’s easier.
Crumpet rings are traditionally used for steaming wheat crumpets, but these rings are the perfect tool for baking this gluten-free recipe as they provide the structure that these need to bake properly. If you don’t have crumpet rings, you’ll need to bake this as a flatbread in a skillet, or you might be able to get away with using the rings from canning jars but they aren’t nearly as tall as crumpet rings so you would have to use less batter in each ring and your resulting crumpet or biscuit would be quite thin.
This gluten free crumpet slices easily and makes a great breakfast sandwich topped with egg and bacon. It is a great option for those that need to eat gluten-free and need an alternative to traditional wheat buns, biscuits, or rolls.
Gluten-free Crumpet Recipe:
1 cup heavy cream
3 egg yolks
1/3 cup tapioca starch
1/3 cup sweet rice flour
1/3 cup millet
1/2 tsp salt
1/2 tsp baking powder
Whisk together the egg yolks, cream, and salt. Add the flours and baking powder and stir until combined.
Let the batter sit for 15 minutes to fully hydrate. This step is especially important for gluten free baking as some of flours, like rice flours, take longer to absorb the liquids. If you skip this step, your end product may be grainy.
Texture after a 15 minute rest.
After the 15 minute rest, check the texture of the batter. It should be like a thin cake batter. You may need to add more flour if yours is too thin. If so, add 1/4 cup of either millet or tapioca flour, stir, and then re-evaluate the texture. If you want more of a biscuit texture, then add a little extra flour for a thicker batter. The more flour you add the heavier and drier the end product will be. For a lighter crumpet/English muffin type texture, aim for a thinner batter.
Baking Your Gluten Free Crumpets:
Once your batter is the right texture, preheat your oven to 400 degrees, and grease your crumpet rings either with butter or spray with olive oil. Set up your crumpet rings on a baking sheet and pour the batter quickly filling the rings about halfway full or a little more depending on how thick you want them to be. A little of the batter will probably leak under the bottom edge, but that’s okay. Don’t worry if it leaks under. Just pop them in them in the oven and they will bake up fine.
Bake at 400 degrees for 20-25 minutes. They are done when they are golden on the top.
These gluten free crumpets have a light buttery and nutty flavor and are delicious with butter and jam, they make a great PB&J, breakfast sandwich, or can even sub as a gluten free hamburger bun.
Enjoy! Don’t sacrifice the foods you love just because you can’t have wheat. 😊
I saw it recommended in Homesteading Family’s Homestead Kitchen Community. It’s become a good reference because even though I can’t use the recipes included in it because of all our allergies, I can use them as inspiration and modify them to suit our needs.
Do you have a sweet tooth and wish you have a healthier option from store bought cake mixes? Here’s your answer. Below, you’ll find make ahead mixes that will sit on your shelves for months until you need them.
Make Ahead Sweet Tooth Cake and Quick Bread Mixes:
Homemade Chocolate Cake Mix Recipe:
This recipe will fill two regular 24 oz spaghetti sauce jars or quart size canning jars.It yields two 9” cakes.
2 1/2 cups all purpose flour
1 1/2 cups sugar
1/4 cup cocoa powder
1 tsp salt
2 tsp baking powder
Combine all the above in a bowl, transfer to two glass jars, and label with ingredients, what to add on baking day, and baking instructions.
On Baking Day Add…
1 cup of milk
2 eggs
1/3 cup of oil
1 tsp vanilla
Chocolate Cake Baking Instructions:
Grease and flour two cake pans. Bake at 350 for 25 minutes until a toothpick comes out clean.
Cinnamon Coffee Cake Mix Recipe:
1 cup all purpose flour
1 cup whole wheat flour
3/4 tsp salt
1/4 tsp baking soda
1/8 tsp baking powder
2 tbsp sugar
1/4 cup brown sugar
1/2 tsp cinnamon
Combine all the above in a bowl, transfer to a glass jar, label with ingredients, what to add on baking day, and baking instructions.
On Baking Day Add…
3/4 cups milk
1 egg
1 tsp vanilla
1/3 cup oil
1 tbsp vinegar
Coffee Cake Topping:
Store this mixture in a baggie in the mouth of your jars. Pour topping mixture into a bowl and cut in 4 tbsp of butter. Then sprinkle on the top of yourcake just before baking.
1 tsp cinnamon
1/4 cup brown sugar
1/2 cup oatmeal or flakes spelt
1/4 cup all purpose flour
Coffee Cake Baking Instructions:
Bake in greased 9” cake pan, or 8×8” casserole on 350 for 35-40 minutes.
Homemade Banana Bread Baking Mix Recipe:
2 1/2 cups all purpose flour
3/4 cups whole wheat flour
1 1/2 tsp baking powder
1 1/2 tsp baking soda
1/2 cup sugar
1/4 cup brown sugar
1/2 tsp salt
1 tsp cinnamon
Optional: Add 1/4 cup chocolate chips.
Combine all the above in a bowl, transfer to two glass jars, and label with ingredients, what to add on baking day, and baking instructions.
On Baking Day Add…
2 eggs
1/3 cup oil
1-2 ripe bananas
Banana Bread Baking Instructions:
Bake in a greased 8×8” casserole on 325 for 1 hour until a toothpick comes out clean.
Shelf Life of Homemade Baking Mixes:
Shelf life is for all baking mixes is 4-5 months if kept cool and dry. See the note at the bottom of this post for how to extend the shelf life for a longer period.
I hope you’ll try some of these recipes. And guess what? If they sound good to you right now, there’s not need to wait for later. Go ahead and mix up a something sweet right now!
Pro Tips for Making Your Own Baking Mixes:
Pro Tip #1: Always use dried spices, never fresh as the moisture contained in fresh spices will cause your mixture to mold.
Pro Tip #2: Save your empty spaghetti sauce jars to fill with dry pantry mixes to give away to friends. That way you won’t have to give away your good canning jars.
Pro Tip #3: If using canning jars, use this little hand held vacuums sealer with this handy jar attachment to suck the air out of your jars and really increase the shelf life of the dry mixes that you make.
Preserving 101: Homesteading Family is currently running a Preserving Challenge in their Homestead Kitchen Community. Check it out if you want to learn more about stocking your pantry with shelf stable, natural foods. The challenge includes canning, dehydrating, freezing, fermenting, and freeze drying.
I saw this book recommended in Homesteading Family’s Homestead Kitchen Community the other day. It’s become a good reference for me as we can’t buy any packaged convenience meals, spice blends, cake mixes, and so on because of all of our unusual allergies and food sensitivities. But this book has been a great help to me because even though I can’t use the recipes included in it, I can take them as a starting off point and modify them to suit our food restrictions.
Here’s the ones we came up with. We decided to try two savory rice mixes, and three sweet ones. Comfort food you know… 😊
This week I’ll give you the instructions for the rice mixes, and next week I’ll share the sweet recipes which will include Cinnamon Coffee Cake, Chocolate Cake, and Banana Bread – all as shelf stable, make ahead desserts!
So, let’s get started!
Make Ahead Savory Rice Mixes:
Orange Rosemary Rice Mix Recipe:
This recipe will fill a regular 24 oz spaghetti sauce jar or quart size canning jar.
2.5 cups uncooked brown rice
1/4 cup dried orange peel
2 tsp dried chives
1 tsp salt
1/2 tsp pepper
1.5 tsp dried rosemary
1 tbsp parsley
1/2 tsp onion flakes
Herb & Spice Rice Mix Recipe:
This recipe will fill a regular 24 oz spaghetti sauce jar or quart size canning jar.
2 1/2 cups uncooked brown rice
2 tsp dry oregano
1/2 tsp dried Basil
1 tsp dried parsley
1 tsp paprika
1 tsp marjoram or thyme
1 tsp salt
1 tsp pepper
1/4 tsp chili powder
1/4 tsp cumin
Mixing and Storage Instructions for Rice Mixes:
Mix all the ingredients in a large bowl. Once combined, fill your jar, secure the lid, and label with ingredients and cooking instructions. Shelf life is 6 months it kept cool and dry. See the note at the bottom of this post for how to extend the shelf life for a longer period.
Cooking Instructions for Rice Mixes:
Add 2 cups of water for every cup of rice. Simmer covered for about 20 minutes until all the water is absorbed.
I hope you’ll try some of these recipes. And guess what? If they sound good to you right now, there’s not need to wait for later. Go ahead and mix up a batch of rice to go with dinner and something sweet for dessert.
Pro Tips for Making Your Own Baking Mixes:
Pro Tip #1: Always use dried spices, never fresh as the moisture contained in fresh spices will cause your mixture to mold.
Pro Tip #2: Save your empty spaghetti sauce jars to fill with dry pantry mixes to give away to friends. That way you won’t have to give away your good canning jars.
Pro Tip #3: If using canning jars, use this little hand held vacuums sealer with this handy jar attachment to suck the air out of your jars and really increase the shelf life of the dry mixes that you make.
Preserving 101: Homesteading Family is currently running a Preserving Challenge in their Homestead Kitchen Community. Check it out if you want to learn more about stocking your pantry with shelf stable, natural foods. The challenge includes canning, dehydrating, freezing, fermenting, and freeze drying.
Those of you that know me, know that I work hard in my kitchen and work my kitchen hard. I make many things like bread, pasta, broth, ferments, jams, kombucha, and cheese that most people buy at the store. I do this not because I necessarily love the challenge of mastering these skills, but because it means that I can control the ingredients and the quality so that we can eat these foods that we would otherwise have to avoid if store bought were my only option.
I honestly can say that Homesteading Family’s the Art of Homemade Bread Class 🍞and Practical Homemade Dairy 🥛 have been life changing for our family, Caleb and I in particular, in terms of the variety and quality of foods that we can eat.
Consider signing up for Carolyn’s free Dairy training. Carolyn gives lots of great info away in these trainings. It’s always good to have something to listen to while you cook or clean.
And even if you don’t aspire to make cheese there are lots of easy recipes to use with fresh dairy – butter and homemade coffee creamer. Mmmm. 😋 And did you know you can easily make buttermilk, yogurt, sour cream, and ricotta easily with no special equipment? Or you can try your hand making your own cheddar, mozzarella, Parmesan, and more. 🧀
If you’ve read this far, click here to join the fun. the link and check it out.
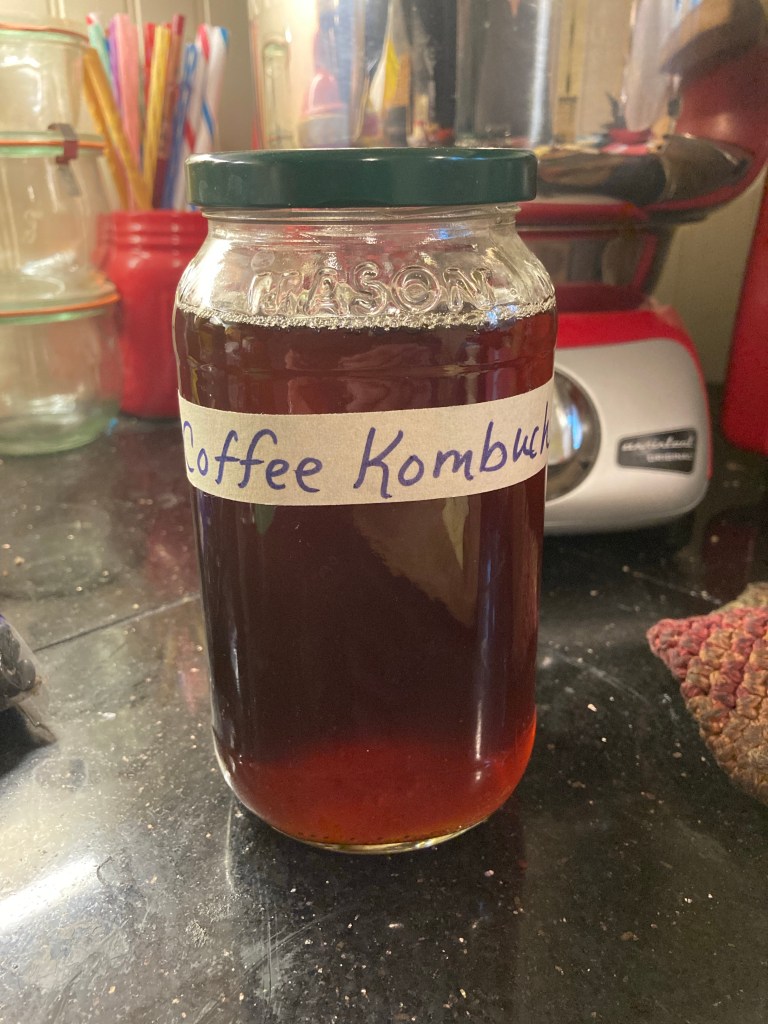
I just learned about it from Farmhouse TeasKombucha Mastery Class, and since I am more of a coffee girl, I had to give it a try and mix up a batch.
Don’t get me wrong. I like a good cup of tea, and I love making my own tea blends with black tea and herbs. And my husband and I are faithful kombucha drinkers, but this peaked my interest. I didn’t even know coffee kombucha was a thing.
But it’s so easy to try. Just mix up some sweet coffee and add some starter tea and let it sit for about 5 days checking it often. It will brew faster than coffee becomes coffee is more acidic. So keep an eye on it and taste it to determine when it is ready. I’m grateful to have the Kombucha Mastery course to guide me along with this advanced brewing technique.
I can’t wait to try it. I’ll come back in five days and keep you posted as to how I like it. 😊
Did you know that you can make your own sour cream at home?
All you need is two ingredients – heavy cream (any kind is fine, but the less additives the better) and buttermilk with live active cultures.
In a clean, dry jar, pour 1 cup of fresh heavy cream from a newly opened carton and add 1 tablespoon of buttermilk. Put on the lid and shake vigorously. Let the jar sit on the counter undisturbed for 6 hours or overnight until the whole mixture thickens and sets.
The key success with this recipe is to use fresh buttermilk with live cultures AND to use heavy cream from a carton that has just been opened. If the carton has been previously opened, you will need to pasteurize your heavy cream to 165 degrees F and then let it cool to room temperature before adding your buttermilk. If you add the buttermilk to the cream while it is hot it will kill the cultures and you won’t end up with anything but a tangy heavy cream and you’ll be back where you started.
If you have access to raw milk you can also use a culture from some of your milk that has clabbered to make some wild sour cream. Simply follow the instructions above replacing the buttermilk with clabber. It works quite well and some people, like my son, tolerate the wild culture better than the cultures in the buttermilk. You can use the cream that you have skimmed from your fresh milk, or cream from the store, and both work fine to make this sour cream at home.
Once the cream has set, store in the refrigerator and use within two weeks.
You can also keep your culture going perpetually if you make a new batch within 7-10 days of culturing the last batch. And if you need extra, just double or triple the recipe. It works great!
Want to learn to make cheese at home?
Consider Homesteading Family’s Free Dairy Training. I love their Practical Homemade Dairy Masterclass. That’s where I learned to make cheese. I’ve made many delicious cheeses using my wild clabber culture and store bought milk. Happy dairy making!
Stay tuned for an allergy friend recipe for homemade, sugar and vinegar free ranch dressing….
You can make this in a matter minutes, the ingredients will cost 1/4 of the price, and you’ll end up with 4x the cheese.
First begin by making this Soft Cheese recipe. It couldn’t be easier.
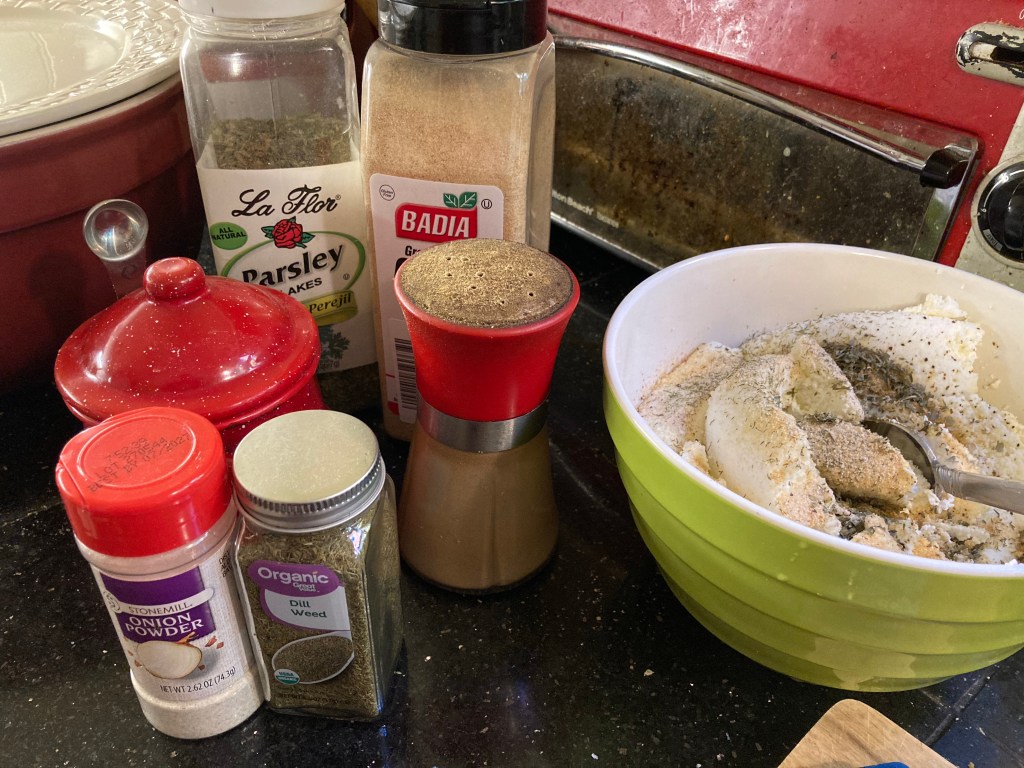
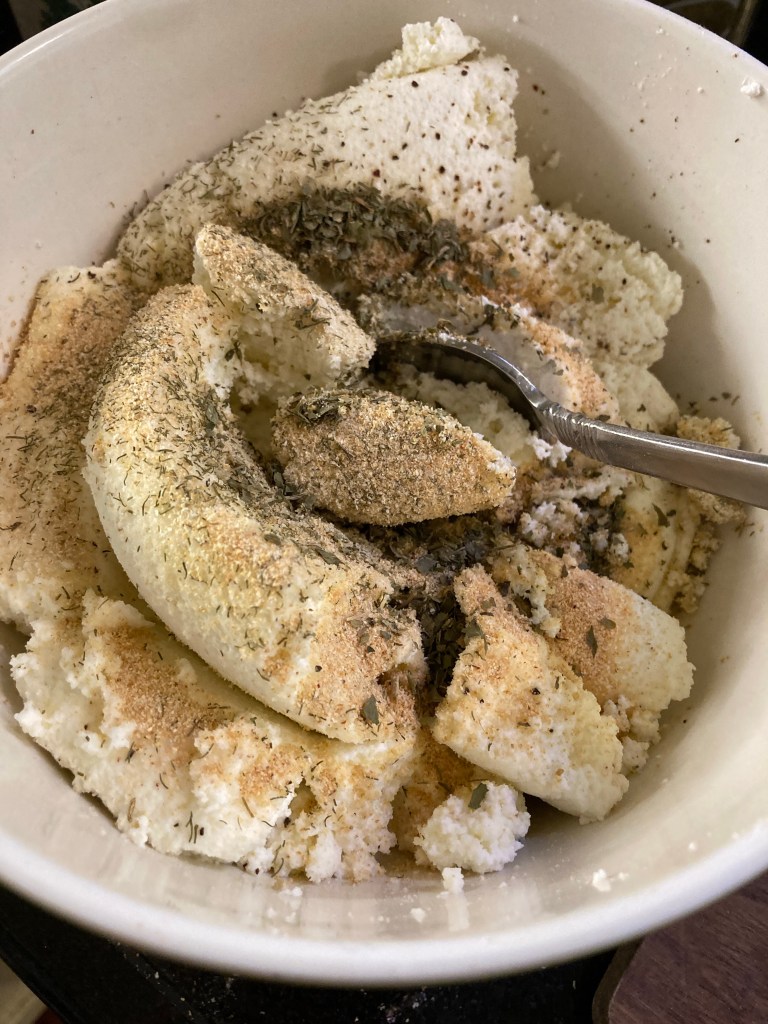
Homemade Boursin Garlic & Herb Cheese:
For 1 gallon of milk, stir in the following:
1/4 tsp salt
1/4 tsp black pepper
1 1/2 tsp granulated garlic
3/4 tsp onion powder
2 tsp dried parsley
Adjust the seasonings to your own tastes. I have also tried this recipe with dill for a little added punch and it’s got a little flare reminiscent of Ranch dressing.
Refrigerate this cheese and consume within 7-10 days.
Garlic Salt is the seasoning I use the most. It’s basic and I find it to be the most versatile. I use it on the kids chicken strips that they eat every day for lunch, and I REALLY like it on our sourdough crackers. If you want to try to craft your own, save an empty grinder and mix the following together.
Homemade Garlic Salt:
3 tsp parsley flakes
3 tsp dried minced garlic
2 tsp onion flakes
2 tsp salt
And if you’re interested in making your own spice blends and seasoning mixes, check out Homesteading Family’s Homestead Kitchen Membership (affiliate link). They have a full Pantry Challenge going on right now with a whole workbook full of DIY baking and spice mixes that you can make yourself for pennies.
This cheese couldn’t be easier. All you need is a gallon of whole milk that has not been ultra-pasteurized, a big pot, colander, tea towel or cheese cloth, lemon juice, and milk.
This recipe yields about 1 pound plus of cheese. If you want a smaller batch, this recipe can also be halved. Just buy a half gallon of milk instead.
Ingredients:
1 gallon whole milk (not ultra-pasteurized)
¼-½ cup acid such as lemon juice or vinegar
¼ tsp salt
Optional Ingredients: seasonings like pepper, garlic, chives, and parsley for a savory cheese, or your favorite jam for something sweet.
Tools:
Cheesecloth or non-fuzzy tea towel
Colander
Large heat proof bowl
Heavy bottom pot (stainless steel, enameled cast iron, or Instant Pot)
Digital food thermometer (optional)
Instructions:
Pour 1 gallon of milk into an Instant Pot or heavy bottomed pot. Heat until the milk is steaming or until a thermometer reads 185 degrees F. If using the Instant Pot, pour the milk in and select the Yogurt setting. When the display reads Yogt, the milk has been sufficiently heated.
Add ¼ cup of your acid and stir. Let the milk sit for 10 minutes. If it doesn’t begin to separate and curdle, then check your temp and heat your milk so that it is a little hotter, or add 2 tbsp more acid at a time stirring to distribute the acid through the milk. Do this until you begin to see the curds separate into greenish looking whey.
Once you see the separation, let the curds sit in the whey for 10 minutes.
Line your colander with the cheesecloth or tea towel and pour the whey into the colander being careful not to burn yourself. There will be lots of whey. Be sure the bowl doesn’t overflow.
Once all the contents of the pot have been poured into the colander, move the colander over to the pot to continue draining until the desired texture has been achieved. If you wish a drier, more crumbly cheese, let it drain longer. If you desire a softer, more spreadable cheese, drain less.
Add salt and seasonings if desired and mix through the cheese.
Serve immediately, or store in an airtight container in the fridge. Consume within 7-10 days.
Soft Spreadable Cheese: Simply drain drain the whey, salt and either immediately warm, or cool and refrigerate until needed. If your cheese is too dry, simply add a little bit of the whey that you poured off and stir back in until the desired soft texture is reached.
Ricotta: Follow the instructions above but drain a little longer until the cheese is a little drier and the curd is crumbly.
Cream Cheese Variation: If you desire a smoother, cream cheese texture, run your cheese through the food processor until smooth. This can be used as a cream cheese substitute.If your cheese is too dry, and won’t blend to a smooth texture, simply add some of the whey back in until the desired texture is achieved.
This cheese is great spread on crackers with a little of your favorite jam to sweeten it up. 😊
Note: Leftover whey from cheese can be used in baking or to water acid loving plants.
Want to learn more….
Consider Homesteading Family’s Practical Homemade Dairy Course (affiliate link) if you’re interested in creating more homemade dairy products in your kitchen. Carolyn covers basic fresh dairy products that you can make in your kitchen like homemade coffee creamers and butter, and then she moves on to cultured dairy like buttermilk and sour cream, and finally easy and advanced cheeses. It’s definitely an all in one course. My family has benefited as now I can make cheese for my son that he can eat because I can control the cultures that are added. It’s the most comprehensive homemade dairy course out there.
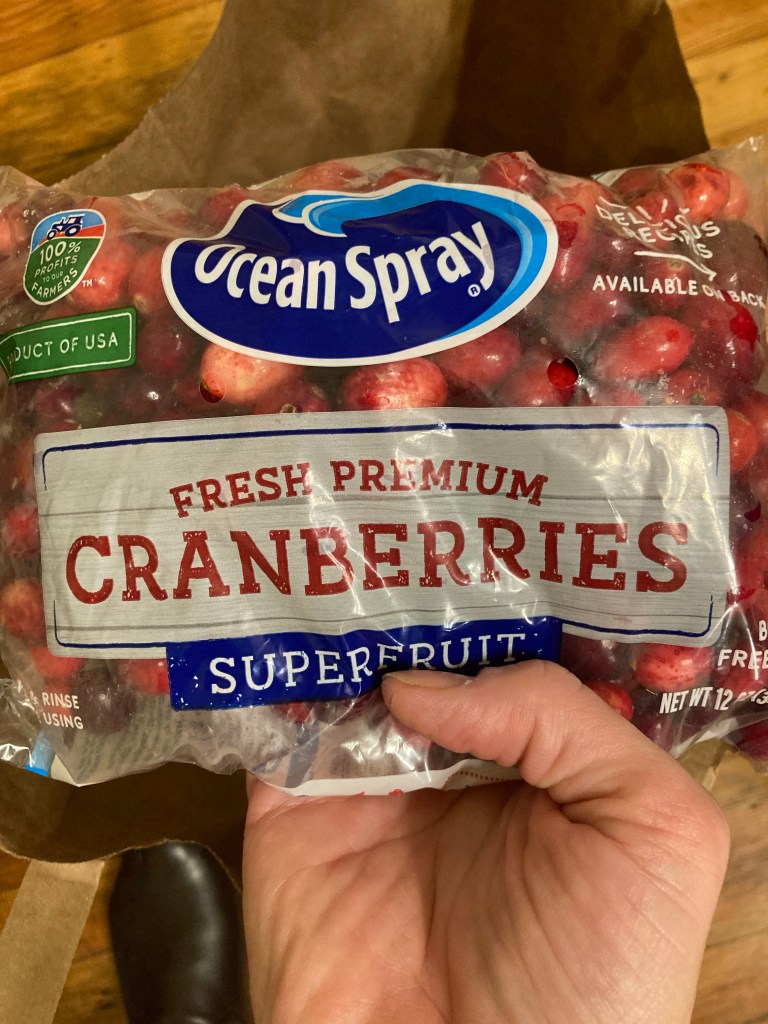
Do your local grocery stores have fresh cranberries yet? If so, snatch them up while you can. I’ve made this fermented Lemon Cranberry Honey the last couple of years and realized last year that I didn’t make nearly enough last time. So I upped my game and instead of the two jars I made last year, this year I made six! One bag of cranberries will yield about three cups worth of relish. Hopefully this will last us through till next year when I can get fresh cranberries again. I tell you there is nothing better on toast in the morning and it makes whipping up a batch of lemon cranberry scones a cinch!
It couldn’t be easier, chop the cranberries in your food processor, put them in a jar, add some lemon peel, cover them with honey, and put on the lid. Let it sit on the counter for a couple of weeks agitating the jar a little each day and then move to cold storage. I’ve had a forgotten jar last nearly a year and it was still delicious.
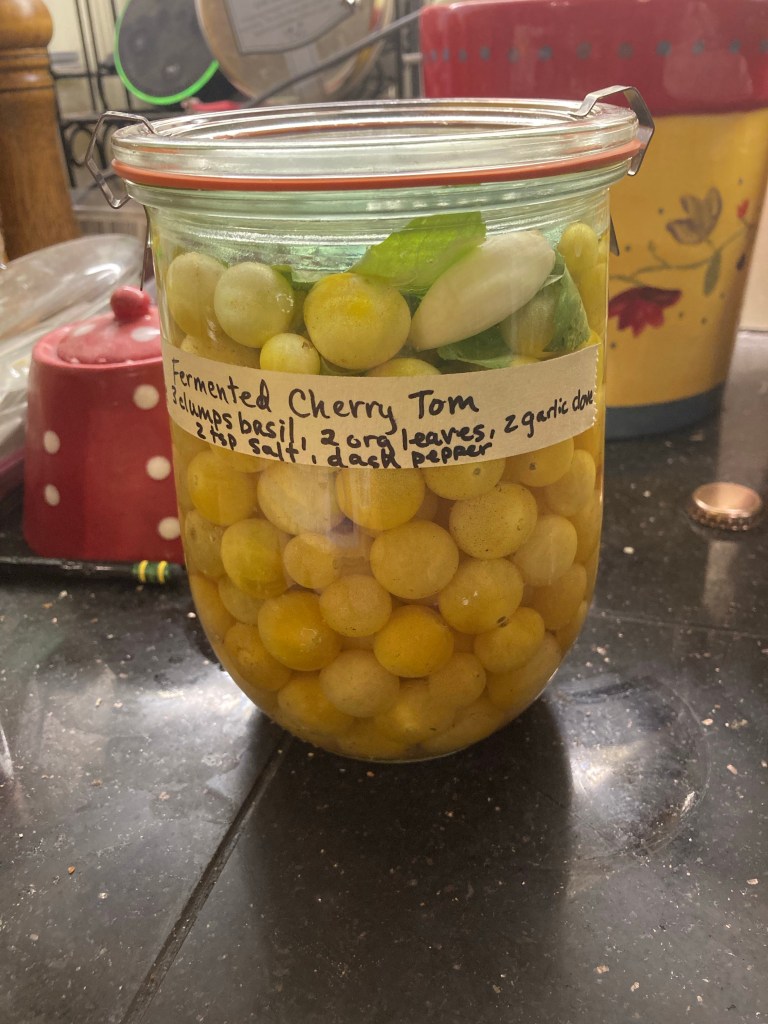
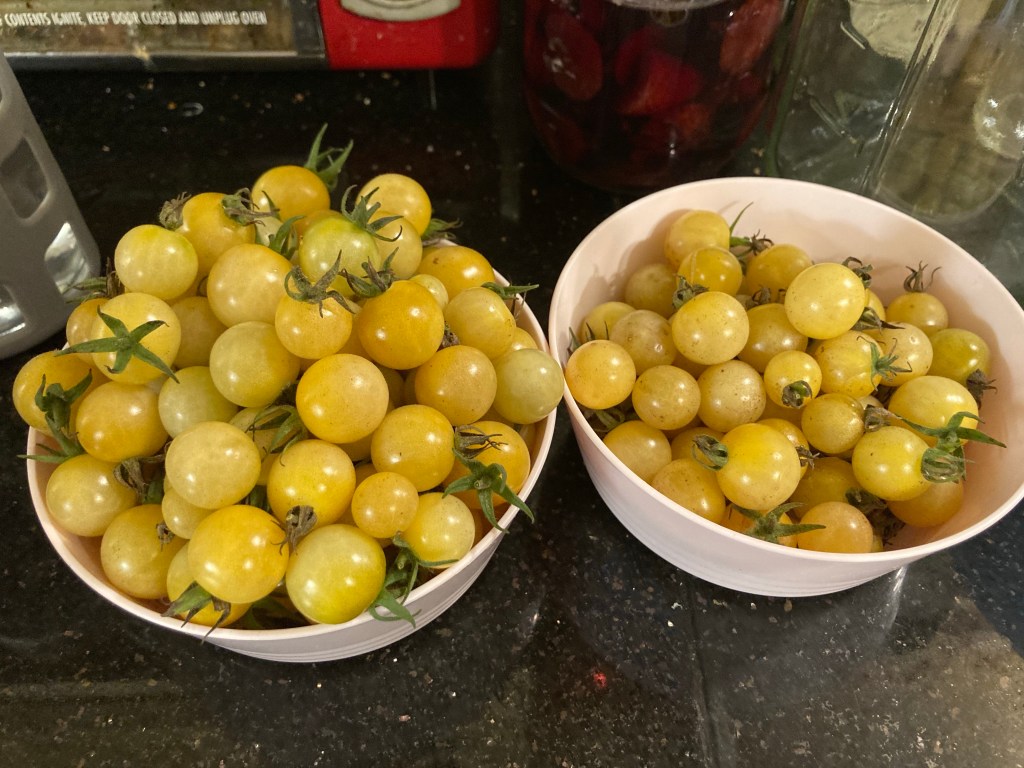
We finally had cherry tomatoes begin to ripen after a long, cool spring, and the hottest, driest summer I can remember. And they are ripening just as it’s beginning to hit the 30’s at night, so I’m trying to bring them in as soon as there is a hint of yellow.
Of course, there are too many to eat fresh, even with a tomato loving six year old, so I have to do something with the extras.
So I made a batch of fermented garlic Basil tomatoes which I’ll probably blend up later on to use as a pasta sauce. After it ferments I’ll strain it and blend it all together in the food processor adding little bits of the fermenting liquid until I like the texture, and then pour over and toss with cooked pasta.
If you want to try your own, take fill a quart size jar with cherry tomatoes to about 1/2” below the shoulder. Add 2 1/2 tsp of salt, a few basil leaves if desired, and 1-2 cloves of garlic (also optional). Cover with filtered or distilled water. Weight down and cover with a glass weight, clean onion skin, or zip-lock baggie filled with a bit of water. Your goal here is to keep all the food particles under the liquid so that they are not exposed to oxygen so that they will not mold.
Loosely screw on your lid, and you’re done! That was easy wasn’t it? Let it sit for 2-3 weeks until it hits a flavor profile that you like, and when it does, move it to cold storage in the fridge. Fell free to open your jar to taste the tomatoes after the first week to see how they are progressing so that you can learn what flavors you like and when to stop the fermenting process by moving it to cold storage. But, each time you open the jar be sure that you settle everything back under the liquid and your weight or follower as fermenting weights are called.
You may notice that the jar I am using is not a regular mason jar. Any glass jar that you have will do. I have used canning jars, old jelly jars, spaghetti sauce jars, etc. as long as it is clean and you have a way to keep the contents submerged, you’re good to go! But these Weck jars are my new favorite jars for fermenting. Why? Well, they are very pretty, but the main reason is that they have glass lids that clip on. This means that I can grab a lid from a jar that is the next smallest size down and use that lid as my weight. It’s so easy and it fits perfectly! I love it! And they don’t need to be burped because the lids clip on. They will release the pressure on their own or you can just give the little tab on the sealing ring a pull if you want to and you never have to remove the lid until it’s ready to be eaten. Plus, if you are a canner, they work for that too. The rings can even be reused. So they are very versatile. They can be pricey if purchased new, but last a long while if cared for well, and I have even found some at thrift stores before and I definitely snatched them up!
Weck Small Batch Preserving (affiliate link) is a great book if you’d like to investigate using Weck jars further for either canning or fermenting. It’s available through most libraries as an e-book, which is how I discovered it. And if you are new to fermenting, the Fearless Fermenting workshop (affiliate link) by Carolyn at Homesteading Family is a great course to get you started.
Hope you get to concoct something fun and yummy in your kitchen soon! 😊