This is easy peasy for all of you who aren’t brave enough (like me) to undertake the daunting process of making your own soap from scratch.
With this recipe you can customize your blends, and add your own essential oils for scent and disinfecting purposes.
We avoid all the natural soaps and all the store bought soaps because members of our family react to the coconut oil in almost every natural soap and have very sensitive skin which reacts to the mainstream soap brands. So, once you take out coconut oil as a base ingredient and all the main soap brands and all their irritating ingredients, then you aren’t left with much except coming up with your own homemade soap. However, the process of making my own soap from scratch is a bridge too far for me right now. I’ll make lots of things from scratch (as you can tell from the recipes on this blog), but cooking fats and handling lye with littles around just makes me too nervous. Maybe I’ll try it one day, but right now, soap is one project that I don’t have the time, energy or ambition for. So, this is the way you do it without having to make it from scratch yourself. And I just found out that it has a name. I’ve been making soap this way for the past several months and didn’t know what it was called until recently. It’s a process called “re-batching.” Basically, you’re taking an existing bar or leftover pieces of soap and remake it.
For our purposes, we will be turning a bar of soap into liquid hand soap and dishwashing soap.
Now, if you research DIY soap recipes online, you will find that almost all of them call for liquid castille soap. Now aside from the fact that most of those contain coconut oil as part of the base for the soap – which rules them out for me – the other factor that has driven me to develop this recipe is the expense. Even if buying castille soap is cheaper than buying regular dish soap at the store, liquid castille soaps are expensive and basically, I’m just not willing to pay that much money for them.
So, here’s what I do instead. Note: This recipe is very easily customized to meet your needs so change the ingredients to suit your purpose.
Basic DIY Liquid Hand Soap:
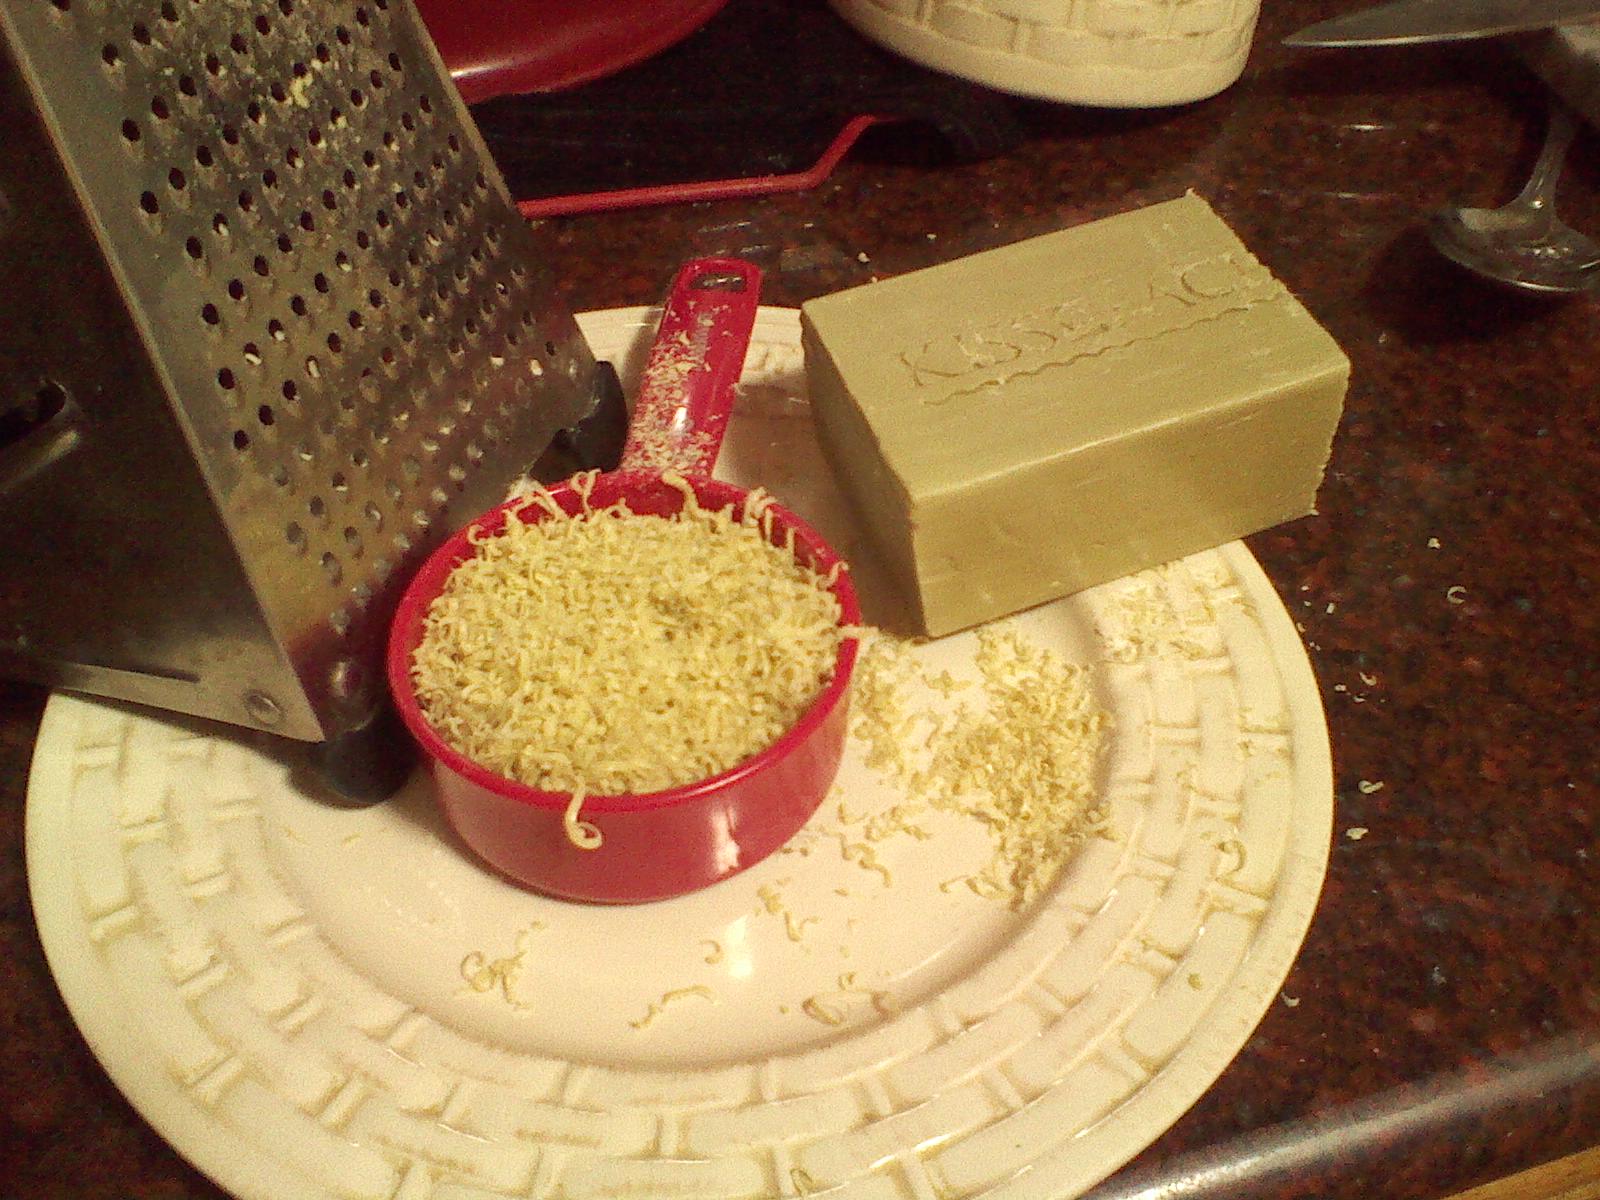
Start with 1 bar of Kiss My Face Pure Olive Oil Soap (affiliate link, see Disclosures Page). Amazon charges $3.99 per bar for this (you can find 8 oz. bars even cheaper other places online), and you’re only grating 1/2 cup of shavings which is a very minimal amount. So, this recipe will cost you probably less a quarter per batch. To make the soap, start with a cheese grater. Grate enough shavings to loosely fill a 1/2 cup measuring cup. Don’t use the largest shredder but the next size down. Dump the shavings into a small glass bowl. Add your favorite essential oils for fragrance and disinfecting. To decide which oils you want to use, click here for a list of essential oils and their properties. Then add 1 cup of distilled water. (You could use tap water if you’ll use the soap up quickly, but if you don’t use it up fast enough you may find bacteria or mold growing in your soap and have to throw the rest of the batch out). Let the mixture sit overnight. The water will soften the soap shavings and in the morning you will have a lovely, scented liquid soap. Stir the soap and pour it into an old soap dispenser and you’re done. This recipe will make enough soap to fill a 10 oz. soap dispenser. If you’re not sure what oil blends to use, my favorite for hand soap are geranium/cedarwood or lemon/lavender. If you want to make a moisturizing soap, add 1 teaspoon of your favorite oil (olive oil, almond oil, etc.) to the bottle and shake well. Note: Over time the soap may begin to solidify or coagulate in places so that it looks like there are things floating around in your soap bottle. This is normal and the nature rebatched olive oil soap. If this happens you can just vigorously shake your bottle to remix it. If it doesn’t mix all the way, you can either use it as it is (which is what I usually do). Or if you bothers you, pour your soap into a sauce pan and gently heat it on low (do not boil) and stir until it is all recombined. When it has cooled a little bit pour it back into your soap dispenser.
DIY Liquid Dish Soap:
Follow the recipe above, except only add 3/4 cup of distilled water to the 1/2 cup soap shavings. This will make a more concentrated soap. If using distilled water, feel free to double and triple the batch so that you don’t have to make it as often. The best oils for dishwashing purposes are citrus blends – lemon, lime, orange, grapefruit, tangerine. I would suggest using lemon as the main oil as it has wonderful disinfecting and solvent/grease cutting properties, and then adding some other citrus oils based on what scents you prefer (be creative and come up with your own combinations). Probably 12-15 drops of oil total is sufficient for a small batch of this recipe. If you double or triple the recipe, adjust the essential oil amounts accordingly. I should warn you that you won’t see any bubbles in your dishwater when using this soap. Olive oil soap is a very low sudsing soap and hardly makes any bubbles. It will still work fine though. It’s just not what we are used to.
DIY Foaming Mosturizing Hand Soap:
Follow the recipe for the basic hand soap above. Add about a 1/4 cup of the end product to a foaming soap dispenser and fill with water. Add 1/2 teaspoon of oil to the soap dispenser to make a moisturizing blend. Keep in mind that olive oil soap doesn’t foam much. So, I use it for one of my bathrooms, but don’t expect typical results in a foaming dispenser. If you want the typical foam then I suggest using this foaming hand soap recipe.
This basic recipe will work with any bar soap that you like and works well for you skin. Feel free to try it with something other than olive oil soap. The moisture content and sudsing may be different with another bar soap, but try it out. It will save you money and if you use a soap with minimal ingredients it will be better for your skin too.