Cleaning and Scrubbing Embroidery Pattern – Sale!

Embroidered by my mom
when we were kids, circa 1980.

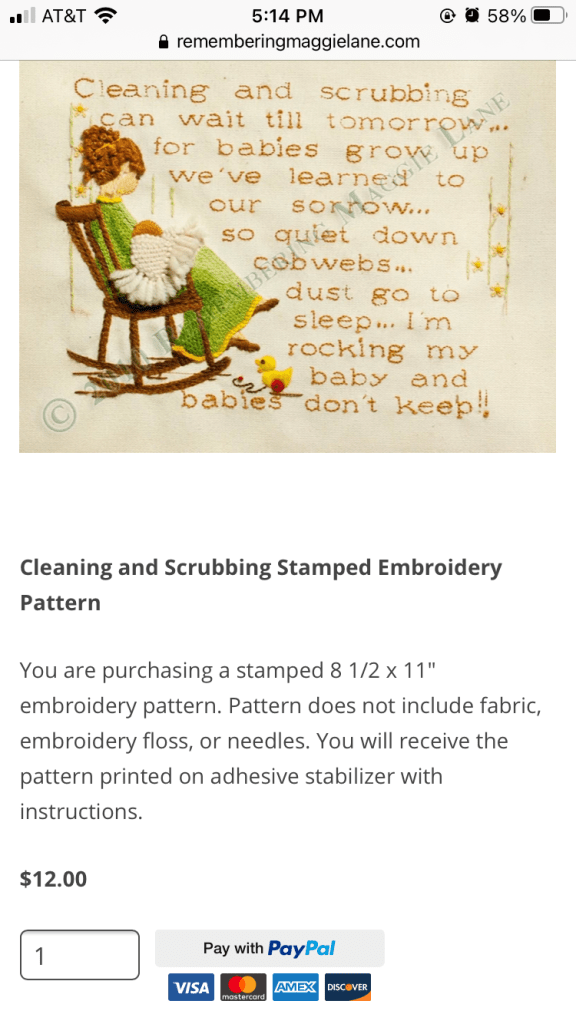
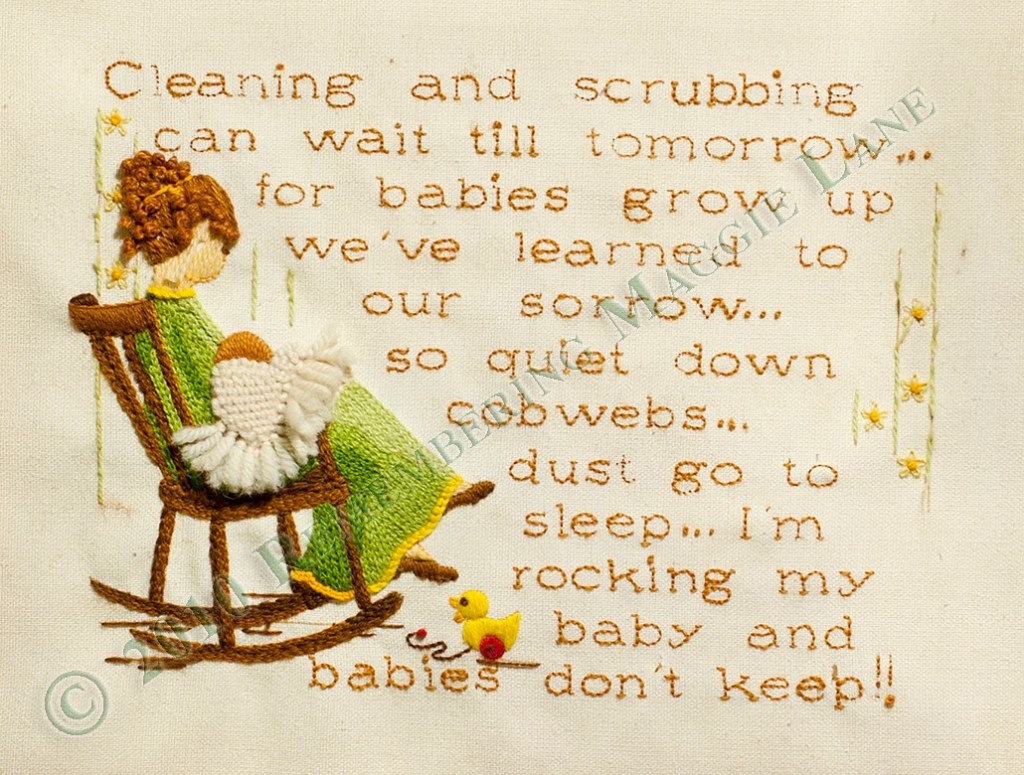
My mom embroidered this poem when my brothers and I were little.

“Cleaning and scrubbing can wait till tomorrow… for babies grow up we’ve learned to our sorrow. So quiet down cobwebs… dust go to sleep… I’m rocking my baby and babies don’t keep!!”

This is one of the first photos that I posted on my blog on the Baby page 10 years ago. It’s been one of the pages that I have received the most comments on, with many people asking if I know where they can purchase the embroidery pattern.

It’s only taken me 10 years, but I’ve finally figured out a way to transfer this pattern to a medium which I can offer for sale.

If you’re interested, head on over to the Baby page for details and purchase information, or click the image below.

Happy Easter – Handmade Easter Baskets for Everyone!

I made my oldest two crocheted Easter baskets six years ago when they were ages two and three. I finally got around to catching up to the other two. The little girls got some crocheted Easter baskets this year. We had lots of fun hunting eggs, spending the day with family and celebrating the joy of Easter.

I didn’t use a pattern. Just grabbed some scraps of yarn and started crocheting in a round adding stitches every other round. Once the base is as big as you want, just keep going without adding any more stitches and the sides will start to form. Crochet the handle with some rows of single crochets or a chain.

HAPPY EASTER!

The big kids’ Easter baskets

The little girls’ baskets

Our Little Pumpkin Snowman

I found a new use for our tiny pumpkins after Thanksgiving was over this year. A couple of weeks into December I realized I should do something with them. I had seen a post where someone had taken some large pumpkins, power drills and white paint and created a snowman for the front porch. I figured I try it on a smaller scale.

First the five year old painted the pumpkins white with craft paint. Then I glued them together (hot glue or super glue is best, craft glue is gummy), three stacked high. Next we painted a little face and buttons down his front. Then the eight year old crocheted a little red scarf and I whipped stitched him up a cute top hat from some felt scraps (trace and cut a big circle, cut a small circle out of the center and then cut a rectangle to size and stitch the three together).

Isn’t he cute? We’ll have to do this next year too.

img_0903

Leafy Twinkle Lights for Fall

Fall is coming. Time to get ready. It’s my favorite season to decorate for. Pumpkins, colored leaves, orange and red and yellow. I just love it. Here’s how to make your own leafy twinkle lights with clearance fall and Halloween items.

11.28.12 001


First, watch for a set of orange Christmas lights on clearance after Haloween (if you didn’t do this last year, then go find some now). Next, buy a set of paper leaves. Grab a set of all those twisty ties that are hiding in your kitchen drawer that you never use on your trash bags and color them black with a magic marker (see photo above).


11.28.12 005


Poke a black twisty tie through the base of each paper leaf. Then twist them around your orange Christmas light strand in even increments (photo above).


11.28.12 009


Hang it up and you have your own custom Leafy Twinkle Lights. A nice addition to your fall decor. The kids might enjoy helping you make it too.


Crocheted Easter Baskets

Easter Baskets 2011

Easter Baskets 2011

I made these for my kids a few Easters ago. Now that the baby is old enough to hunt eggs I need to whip her one up too. The thing I love about these: I’m not throwing away broken straw or plastic Easter baskets every year only to buy new ones. You can use them year after year. They will get use at times other than Easter too. As I type my kids are roaming around the house packing “things” in their baskets pretending to go on a trip. I don’t have a pattern to for these to share with you since I just eyed it and made them up as I went along using yarn scraps that I had. I used bulky cotton yarn for mine so that they would be durable, sturdy and long-lasting. If you want a pattern to follow, look over the ones from Lion Brand. You’ll need to register to view their patterns, but they have a lot of simple patterns that I like. The first one in the list if you search for Easter basket on their website is the one that I patterned mine after looking around for ideas. Happy crocheting and have a blessed Easter!

DIY Crayon Rocks


How many of you have seen these Crayon Rocks? They are great because they travel easily and they are easy for little ones to grasp. They don’t crumble when they get stuffed down in the bottom of your bag, and of course the little red bag that they come with is very cute and trendy. But, at $10 per bag it’s pricey for crayons.

2.13.14 013I admit, I did buy a bag that I found locally for half the regular retail price as a treat for the kids. But, then I got to thinking, why not make my own? It’s easy.

To begin, start saving all those tiny bits of crayons that you would normally throw in the trash. Once you have a handful collected, fill up each heart in this Silicone Heart Mold (affiliate link) with pieces of the crayon of the same color. This particular mold is the best I’ve found for mimicking the shape and feel of the crayon rocks. The resulting crayons are small, and the indentation in the mold makes them easy to grasp. Set the mold filled with the crayon bits on a cookie sheet for support and pop it in the oven on 200 degrees for 15-20 minutes or until they are all melted. Let them cool completely, pop them out of the mold and the kids are ready to color. Find a cute cloth bag to store them in (or go the easy route and use a plastic baggie) and you’re all set.

Molten crayon wax. Just removed from the oven.

Molten crayon wax. Just removed from the oven.


A bucket full of crayons.

A bucket full of crayons.


Pretty.

Pretty.


Window Silhouettes

2.13.14 006I’m so proud of myself I have to share this. It’s not terribly practical of me since I don’t have a template to share or any step by step directions to share, but it turned out so well maybe some of you can come up with something cute for your windows. You could outline anything and turn it into a decoration that is cute and whimsical. Let the kids try their hand at it too. All I did was draw the outline that I wanted in chalk on black construction paper and then cut it out and tape in on the window. Doesn’t it look like Mary Poppins and Bert are dancing on the rooftops? And in the snow no less! It makes the window with the ugly view much more fun. If you can’t freehand your drawing then you could trace over an image or print an image out on regular white paper. Cut that out and then trace around it with chalk on your black construction paper. Supercalafragilisticexpialidocious everyone!

From this angle it looks like they're dancing in the snow. :)

From this angle it looks like they’re dancing in the snow. 🙂

Snow Day Activity: Indoor Sandbox

We pulled out the indoor sandbox today that we made this summer.
Works on snow days as well as blazing hot ones. So imagine the same kids pictured below playing today in long-sleeves and sweaters.

——————————————————————————————–

7.19.13 017
What to do when you’re stuck inside due to snow,
single-digit temperatures and 30 mph winds?

Today we pulled out our indoor sandbox.

Spread a large sheet on the carpet (as pictured above).

7.19.13 019

Raid the pantry for all the partial bags of old
beans, rice, lentils that hadn’t been used in ages.

7.19.13 021

Dump them all in.

Instant “sandbox.”

We used the box that our building blocks are usually stored in, but you could also use a cardboard box, lego tubs, laundry baskets, dishpan, canvas storage boxes, an old suitcase or even a large plastic or stainless steel mixing bowl.

(Note: Obviously this activity would not be appropriate for babies or young
children who still put things in their mouths. Lots of choking hazards here.)

7.19.13 022

Add some colored toys or manipuatives and you have an
instant sensory, color sorting game.

Grab some cups and spoons and start digging.

Homemade Firecrackers

140101_0005Not really. They are more like a firecracker shaped hand-held pinata that you pull apart.

This Christmas, Grandma and Grandpa brought our kids a London tradition of Christmas Crackers like these which are basically paper rolls stuffed with prizes. So, I replicated the idea for our New Year’s Eve celebration this year. Our six year old made them all herself and the kids had a blast opening them and seeing all the stuff fly out on New Year’s Eve.

Here’s how to make your own.

The pieces of our homemade firecrackers.

The pieces of our homemade firecrackers.

1. Cut a paper towel roll into four even segments or cut a toilet paper roll in half.
2. Stuff with candies, chocolates, tiny pieces of cut up scrap paper or ribbon to serve as homemade confetti. The heavier the contents the better for the flying about the room effect.
3. Wrap the stuffed cardboard rolls with tissue paper (we used leftovers from Christmas).
4. Twist and tape the ends. Tie with ribbon (again save all those leftover Christmas ribbons).
5. Decorate with stickers, marker, glitter, etc. if desired. The grown-ups can help too. 🙂

On New Year’s Eve, put a kid on either end of your homemade firecracker and pull. Watch the stuff fly and be sure and yell “Happy New Year!” The scramble to grab the goodies ensues and then the cleanup at the end. But, it’s fun and a good family celebration. And if you don’t want to use edible treats even fun small toys that you have laying around the house will work – legos, puzzle pieces, toy coins, etc. Fill them up with whatever. It’s the surprise that is the most fun.

Pin it for next year. Copy this tiny URL: http://wp.me/pWQ7Q-ss.

Decorate for Fall – Leafy Twinkle Lights

I love decorating for Fall. I don’t know why. It’s just fun. Pumpkins, colored leaves, orange and red and yellow. Here’s how we made our own leafy twinkle lights with clearance fall and Halloween items. 

11.28.12 001


First, watch for a set of orange Christmas lights on clearance after Haloween. Then buy a set of paper leaves. Grab a set of all those twisty ties that are hiding in your kitchen drawer that you never use on your trash bags and color them black with a magic marker (see photo above).


11.28.12 005 


Poke a black twisty tie through the base of each paper leaf. Then twist them around your orange Christmas light strand in even increments (photo above).


11.28.12 009


Hang it up and you have your own custom Leafy Twinkle Lights. A nice addition to your fall decor. The kids might enjoy helping you make it too.


Recent Posts

Trains – the toy box is full of new train track configurations for Thomas & Friends!

Homemade Hand Soap – cheap, easy, disinfects and smells great!

Laundry Spray – make your own spot remover that costs pennies in less than 2 minutes.

Gluten-free granola and granola bars – Made with nutritious whole grain quinoa.

Pumkin Butter – Yummy any time of year.

Two new Sewing Projects – See what kept us busy before Baby #3 was born.

Maple Syrup – Too much maple syrup on your pancakes? Easy solution…